

Below we dive into 5 drills that are great for evaluating your players at tryouts.
This segment will focus on 5 hockey drills that will allow you to look for crucial elements in both the skill and compete level of each player. Remember that a scrimmage is an absolute must for any higher level tryout and that the drills in this post should be used to evaluate specific skills, compete level and should supplement what you see in the scrimmage(s).
#1 - Skating Drill
Let's be clear, all hockey tryouts should include skating drills so you can evaluate the skating ability of each player without any distractions. You don’t want to bury them with an intense conditioning drill right away, but one that allows you to see their skating technique and footwork. This skating drill below is one of my 5 recommended drills because it will you allow to watch for and evaluate each players' balance, crossovers, pivots, strength, speed, footwork, technique as well as their ability to stop. I recommend that you emphasize the fact that they have to stop before each time they begin to side-step. A lot of players will just turn into them, but it is more effective to see them stop so you can see how quick they can get their feet moving.
View Howie's Warm Up Skating Evaluation Drill >>
Usually, this drill can weed out skaters with weaker balance and footwork, especially with the side-steps. If you are coaching at a lower level feel free to take out the backwards start and pivot, and maybe replace the side-steps with just normal skating. I wouldn't immediately cut a player if they can't perform this drill well as they may bring you high value in their work ethic and compete level, but their performance in this drill should be well noted.
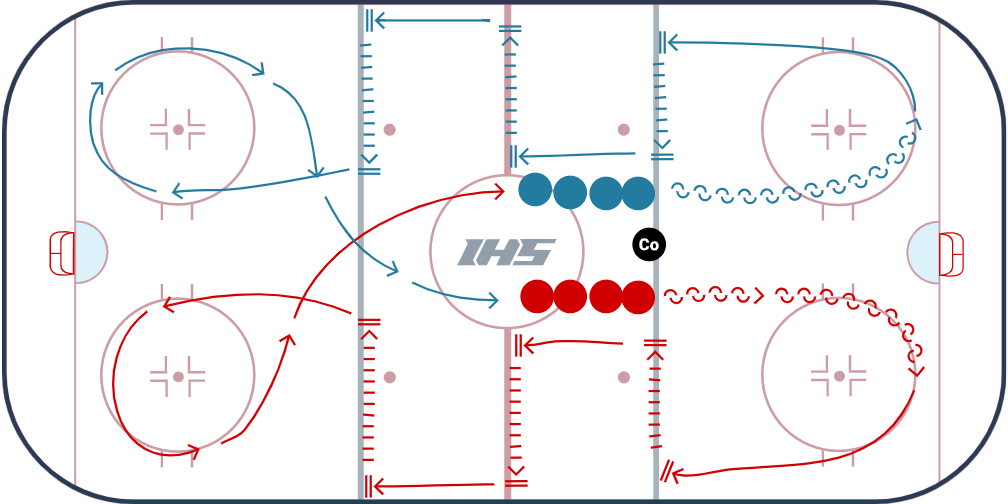
#2 - Passing/Shooting
I think it’s important to follow up the skating drill with a passing/shooting drill. This will give you an opportunity to evaluate their passing, skating, and shooting. The Four Lines Series #4 drill will also give you a good opportunity to start looking at the goalies. It works on puck movement while players are stationary as well as when they are moving and will show the player’s ability to receive a pass and move the puck quickly. It also gives you an opportunity to listen to players and see if they are calling for the puck or not. Make sure that players aren’t taking the puck into deep before they shoot. You will want to see shots taken from the high slot in this drill.
Also players need to pay attention as the drill can get a little complicated. This can be a good indicator of the player’s attention span. If this drill is a little complicate for your age/skill level we recommend the 3 lane shooting drill. It is a lot simpler and takes less time to explain.
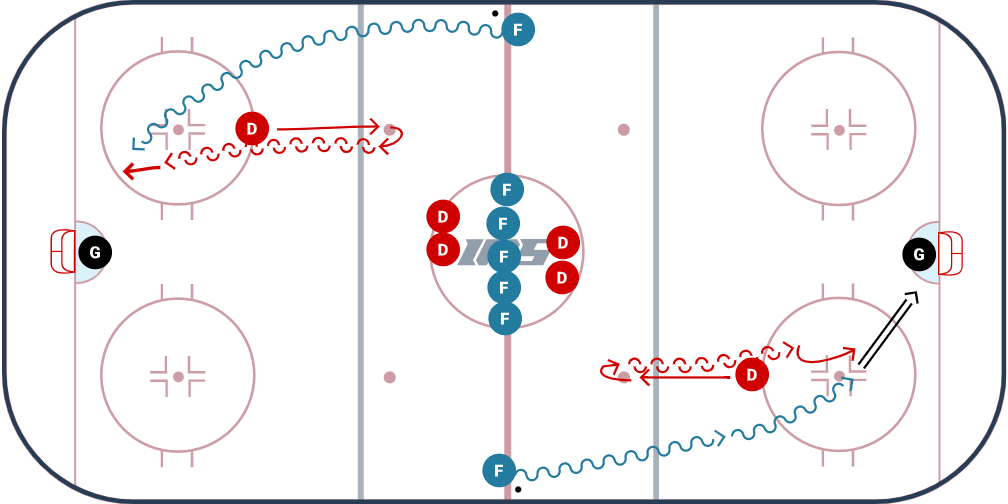
#3 - Goal Scoring
Mixing in a pure goal scorer’s drill is important for any hockey tryout at any age level. This Inside to Outside Attack Drill is very simple, but it will allow you to evaluate offensive skills and shooting as the players attack the seam in the offensive zone. It will also get you a better look at the goalies and their angles and footwork as the puck is shifting from outside to inside. Once again, I recommend quick shots and not holding on to the puck too long once they pass the middle cone. This drill is geared more towards offensive players, but it’s good to run your defensemen through it as well. You can also have defensemen do a similar drill at the other end of the ice, but move the cones up closer to the blue line and have them take slap shots.
#4 - 1 on 1
Having a 1 on 1 drill in your hockey tryout is an absolute must. This will give you an opportunity to see the creativity of the forwards and the strength of your defense. There are a lot of good 1 on 1 drills to choose from, but this is one that I recommend. It will show how well your defense can recover and will expose any d-men that may have some footwork issues. Feel free to start the drill lower in the zone so that it becomes a full ice 1 on 1 on both sides. I would give each forward a minimum of 6 reps and each defenseman a minimum of 10 reps in this drill.
For the defensemen, you should be watching for where they are looking (they should have their head-up looking at the forwards chest). You should also be looking for foot speed and their body position as the opposing forward approaches. For the forwards you should note their speed and how many times each forward creates a scoring chance. Smart forwards will use at least two of their reps to use the defenseman as a screen and get a shot on net. An additional forward can always be added to make this a 2 on 1 if you would like to see some more offensive chances and how your d-men are playing a 2 on 1.
#5 - Battle Drill
Having some sort of battle drill in a tryout can really show you what a player is made of. This drill explained by Hall of Famer Denis Savard is a great drill to run. It will really bring out the true colors in the players trying out and will show how they match up against other players who are trying to make the team. This drill should be used at the end of tryouts and is great if you are trying to evaluate players who may be on the bubble of making the team. Feel free to match up the players you want to see going at it and swapping out forwards for defensemen if the situation calls for it. This is your opportunity to see the match-ups you want to see when they are tired and exhausted. Also, feel free to make it just a 1 on 1 or a 2 on 2, whatever you need to do to make those tough final decisions.
5 drill tryout