Rows

Full Width
Grid

Cheat Sheet
U10 - Puck Protection Skills
U10 - Puck Protection Skills
Thursday, October 21st, 2021
This practice focuses on developing the technical and tactical puck protection skills and ice and spatial awareness.
Key Coaching Points:
- When and why puck protection is used in various situations on the ice.
- Importance of keeping head on a swivel and still being ale to see the play, teammates, and the opposition.
- Embracing the fun of competition and creativity - have kids embrace incorporating these new skills in battles, compete drills and small area games, and using these skills in creative ways.
Practice Layout

Protect The Puck Warm-Up (Individual & Team)
Details::
This is a fun dynamic warm-up that helps coaches jump-start practice with a competitive puck protection exercise, followed by a competitive team puck possession exercise. Depending on the age and skill level of your players, coaches can modify this drill to make it easier by adding more pucks, or reducing the number of players involved. Scroll to the bottom of this description and you can view examples of how to make these exercises a game (which makes it very fun for younger players).
Setup
Part # 1: Individual Puck Protection
- Split up your team into two groups. If you have full ice, each group can play in their own offensive zone. If you have half ice, one larger group can play in the zone, and the second group can play in the neutral zone.
- On the whistle, a coach chips in a limited number of pucks for players to battle over. In the video, there were 3 pucks used for 10 players. Coaches can add more pucks to make it easier for the players or for younger age groups. Play this out for a minute or so before you switch to a second group or move to Part # 2 of the drill.
Part # 2: Team Keep Away
- The coach combines the groups so there are now two teams playing inside one zone.
- On the whistle, the coach chips in a limited number of pucks for players to battle over. In the video, there were 2 pucks used for the two teams.
Variations
- Make it easier: add more pucks or reduce the number of players.
- Ice space: Can set this up in different areas of the ice.
- Players: Can use your whole team at once or split up into groups so players get a rest.
- Gamify: Can make drill into a very fun competitive game by playing Finders Keepers (players are knocked out of each round if they do not have a puck when time is called) and Finders Keepers With Teams (the team with the most pucks at the end when time is called wins).
Coaching Points
- Part #1:
- If you have the puck, work to protect it with your body and by keeping your head up so you can skate to space, or cut back to create space.
- If you do not have the puck, keep your stick on the ice and compete to get the puck back.
- Part # 2:
- If your team has the puck, keep your head up so you can utilize give & gos!
- If your team does not have the puck, keep your stick on the ice to take away passing lanes and compete to get the puck back.

Length of Time:
8-min (4-min ea)
Station Number:
1
2 to 1 Puck Protection Drill
Details::
An excellent drill to work on puck protection. The setup is simple, two offensive players and one defensive player in the circle. The goal is for the offensive players to skate around and work on protecting the puck with moves, their body and stick. The goal for the defensive player is to knock the pucks out of the circle. The drill stops if the defenceman knocks out both pucks or if the coach blows the whistle. If the defenceman are knocking the pucks away too easily, you can have the defense flip their stick. The drill is good to switch forwards and defenceman and allow players to get reps at both sides.
Drill Image:
Length of Time:
8-10min
Station Number:
2
Partner Mirror Drill with Race to Puck
Details::
The drill is set up at both ends of the ice on opposite sides. The focus of the drill is on change of direction skating and racing to pucks for a scoring opportunity.
Red players are the leaders. Blue players are the followers. On the whistle, red players can skate anywhere between the goalline and blue line working on tight turns, stops and starts, backwards, etc. Blue players are mirroing the leaders. They have to keep their head up and follow the movements. This happens for 10-15 seconds and then the coach blows a second whistle. On the second whistle, the players race to a puck placed in the neutral zone. First player to control the puck is on offense and trying to score at the net at the far end.

Length of Time:
8-10min
Station Number:
3
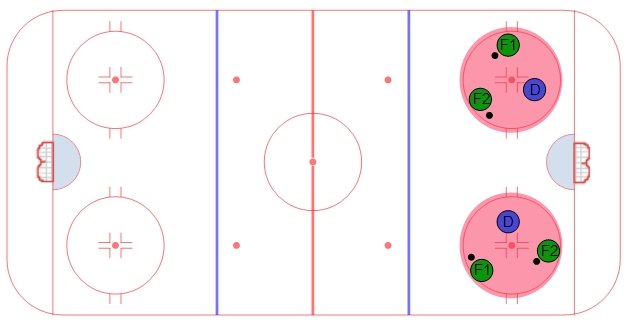
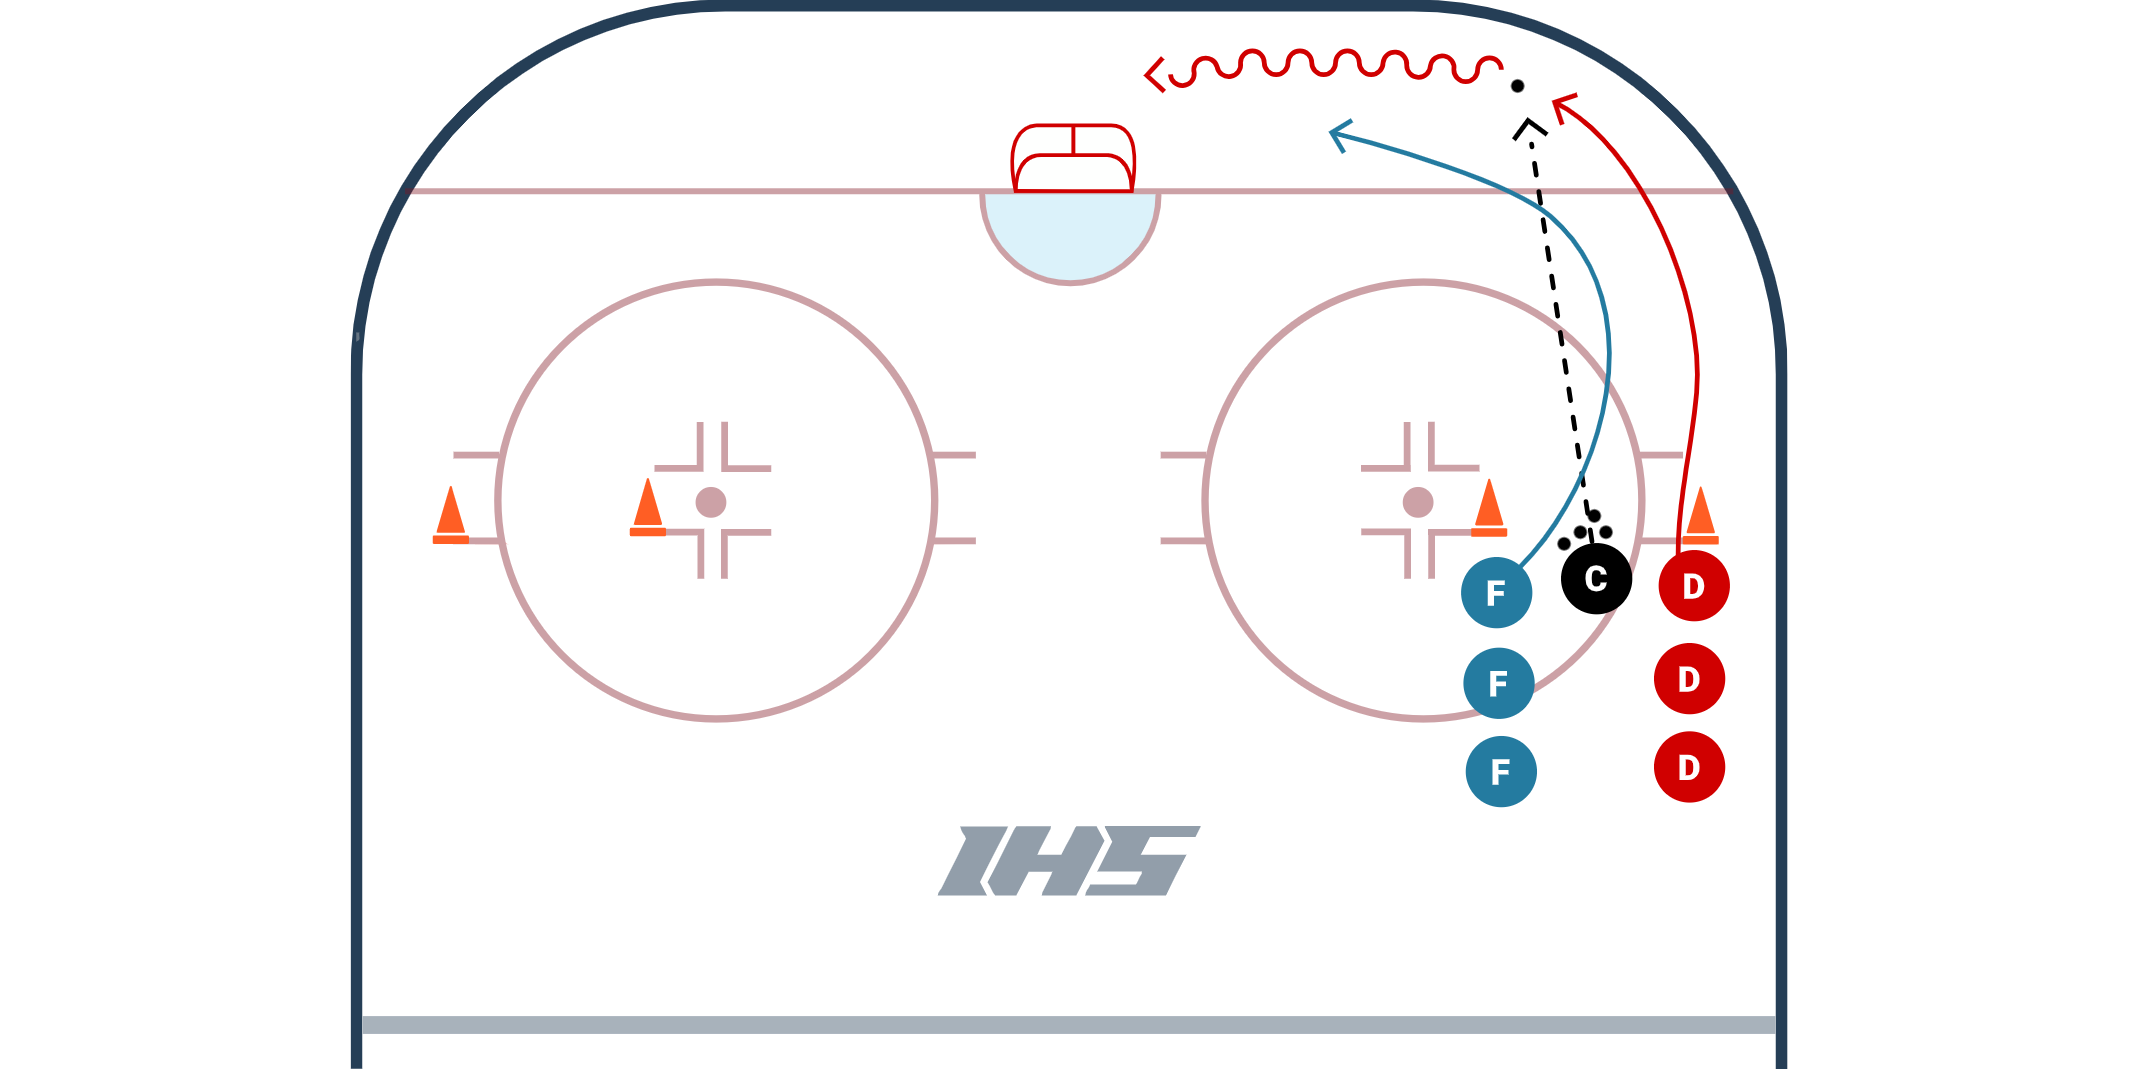
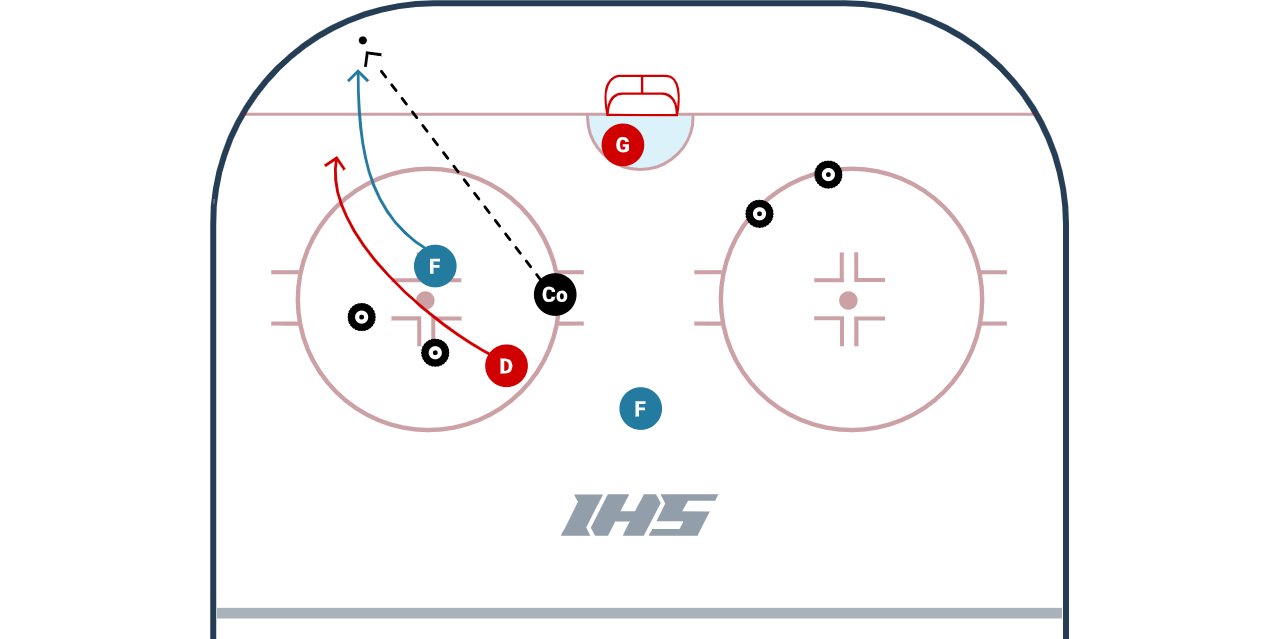
1 v 1 Angle Around The Net Drill
Details::
The 1 v 1 Angle Around The Net Drill is an excellent drill to practice forechecking angling for forwards and puck retrievals for defencemen. Forwards and defenceman should get reps at both positions.
Drill Objective: The goal of the game is for the defenceman to collect the puck and skate the puck through the cones. They can go in front of or behind the net. A forward can score a point by stripping the puck from the defenceman and scoring a goal on net. It is a draw if the puck goes out of play. The game starts for the defenseman when the coach chips the puck into the corner. When the coach bangs his stick on the ice, the forechecker starts.
Angling Coaching Points:
- Stick on the ice (to help you angle, intercept a pass, or go stick on stick to take the puck away).
- Match the speed of the player you are chasing.
- Take a proper angle (as pictured in the diagram) so the player can not easily turn back up ice.
Puck Retrieval Coaching Points:
- Look over your shoulder to see where the pressure is
- Retrieve puck at an angle. This will allow you to keep your speed up while you collect the puck.
- Use deception to shake off your forechecker. Use your skates, hips, shoulders, head, or stickhandle maneuvers to make the forechecker think you are doing something else with the puck.
Variations:
- Can be set up as a station, on half-ice, or on a studio rink.
- The coach can give the defenseman a smaller or larger head start.
- Can move the cones to be further away (so there is more skating) or so the goal is larger or smaller to skate through.
- Can add a goalie.
- Can give an extra point to the defenseman for making a pass to a player or coach that is breaking out.
Length of Time:
8-10min
Station Number:
4
Double Gates Activation Game
Details::
The Double Gates Activation Game from Coach Alyssa Gagliardi is a competitive small area game that starts out as a 1 on 1 and becomes a 2 on 1 after a player skates through one of the gates. This can also be modified to be a 2 on 2 that becomes a 3 on 2.
Setup
- Place a gate (gates can be made by tires, cones, etc) on each side of the net. This will create two gates and two options for the offensive player to skate though.
- Place one forward and one defender in one of the corners or circles.
- Place an additional player at the high slot or point.
- To start: a coach chips a puck in the corner to begin a 1 on 1 battle.
- The forward is trying to first skate through a gate. Once the forward skates through the gate, they are able to pass it to the open player at the point to begin a 2 on 1. The offensive team is trying to score a goal.
- The defender is trying to strip the puck during the 1 on 1 and/or the 2 on 1 and skate out of the zone.
- The coach can stop the play when there is a goal, the defender skates the puck out of the zone, the goalie freezes the puck or enough time has passed (15 - 30 seconds).
Coaching Points
- Offensive player:
- Look over your shoulder to see where the pressure is coming from.
- Do not expose the puck until you are ready to make a play. Use the net and the boards to protect the puck!
- Keep head up to be aware of where the gates are and the extra player is.
- Defending player:
- Work on taking a good angle.
- Keep your stick on the ice to go after the puck and to block passing lanes.
Game Variations
- Can allow the forward to immediately try to score a goal, or you can require them to first go through the gate before they can score. Either way, if they go through the gate the other forward is activated.
- Can set up gates in different areas of the ice.
- Can add gates at the blueline that the defense needs to skate through instead of skating over the blueline.
- Can start the game in different areas of the zone.
- Can setup the game in smaller areas of the ice (example - 1/4 ice instead of 1/2 ice.)
- Can be modified to be a 2 on 2 that becomes a 3 on 2 (diagram displayed below)
Length of Time:
10-12min
Station Number:
5
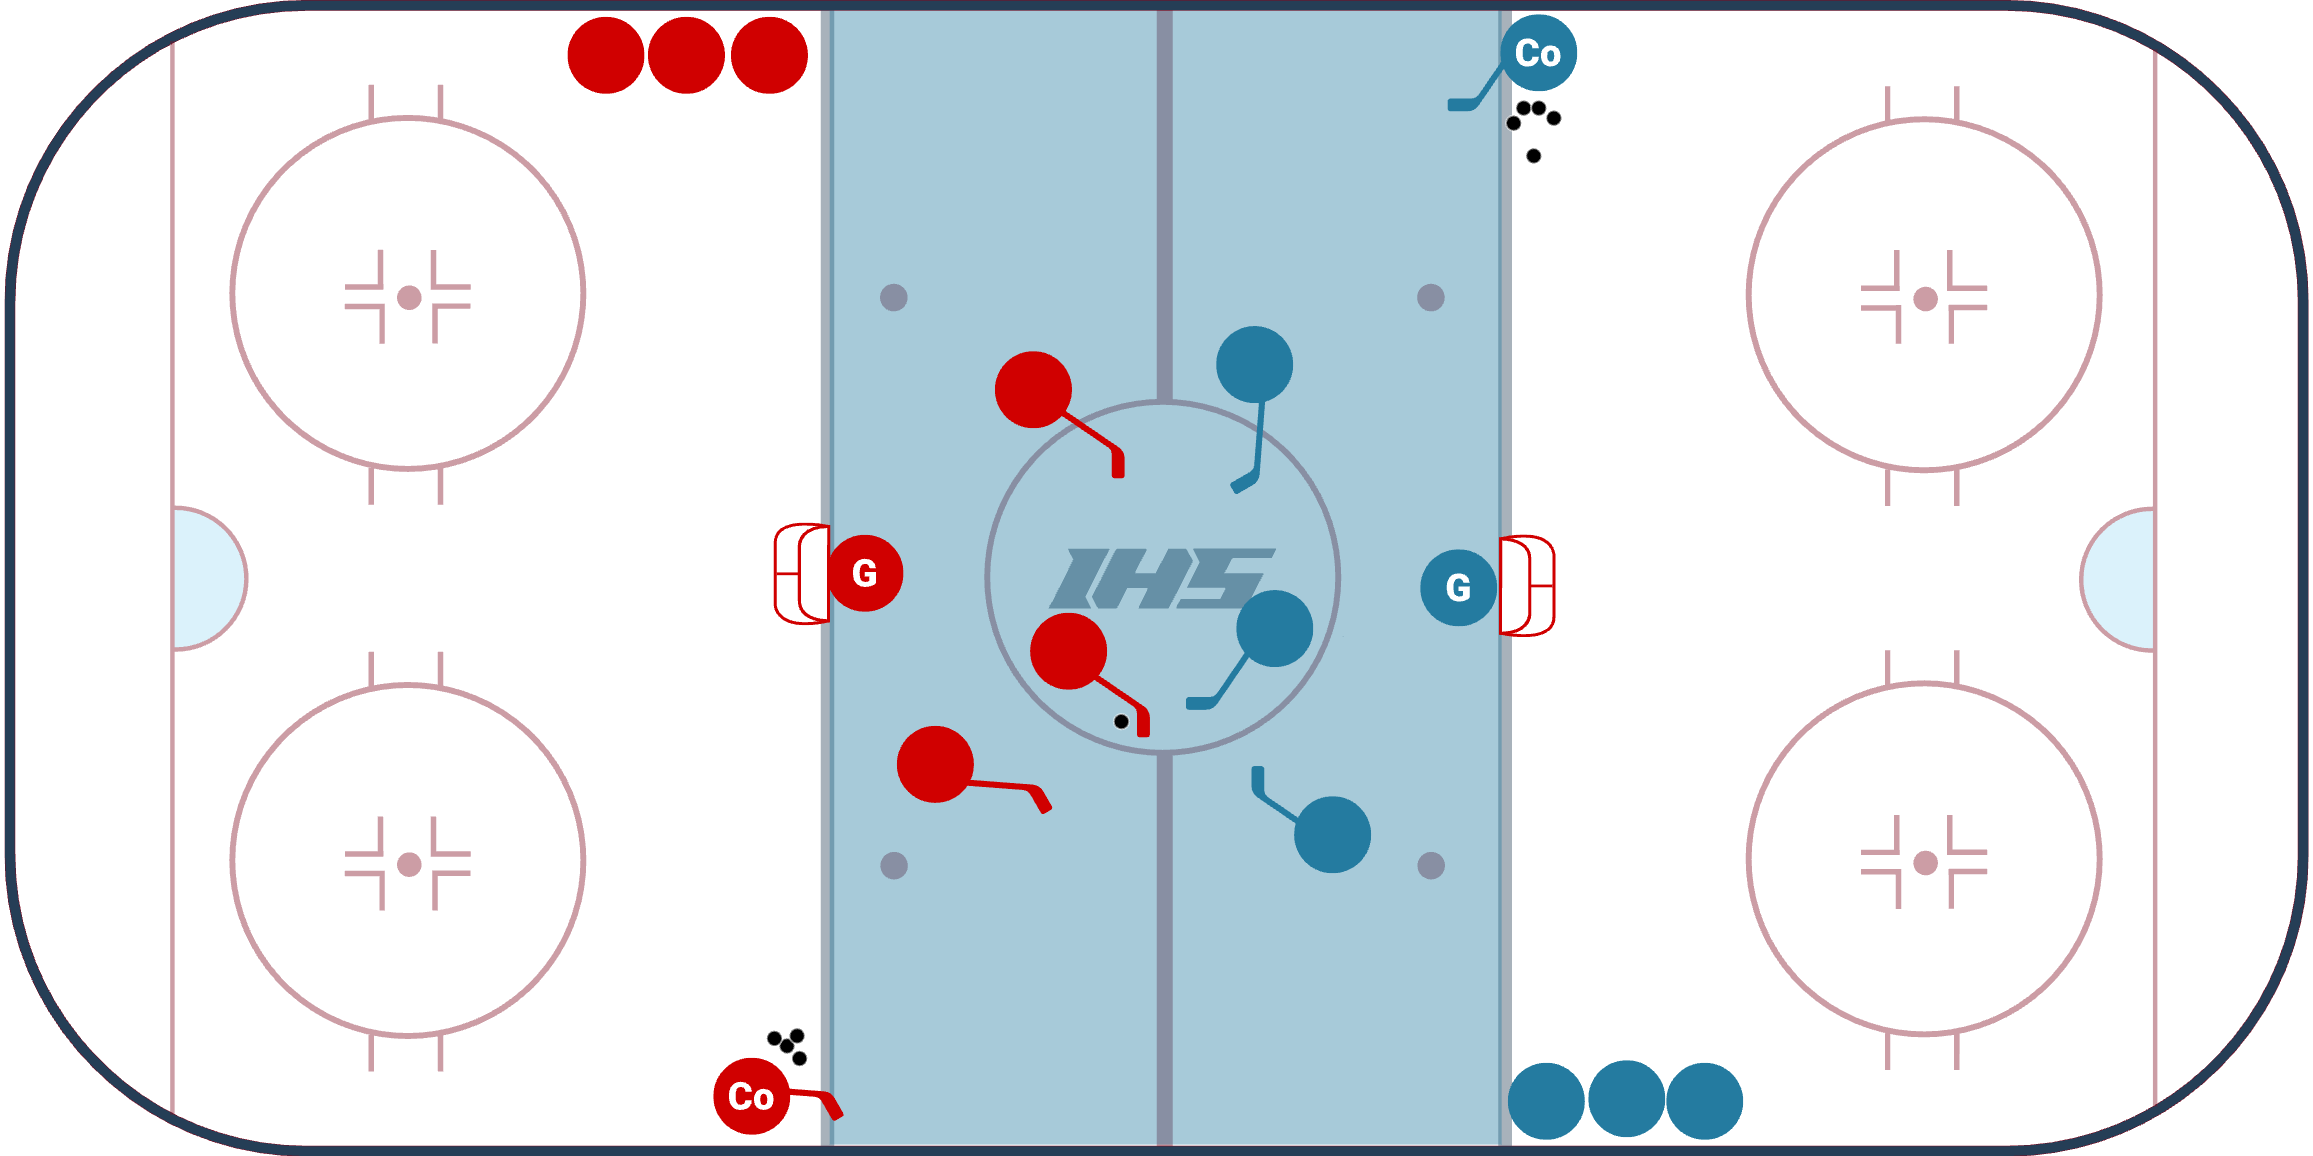
Neutral Zone 3 vs. 3 Game
Details::
The Neutral Zone 3 vs. 3 Game is a great small area game that creates a lot of turnovers and transitions, which is common for the neutral zone. To be successful, teams will need to play with their head up, keep their sticks on the ice and communicate with their teammates.
Game Setup
- Teams line up in opposite corners of the neutral zone (as pictured in the video and diagram).
- Each team has a coach (or player) that is on their team and is lined up on the same blue line as them.
- Each coach (or player) needs to be aware of the game and they are required to pass their team the puck if the puck goes out of play, a goal is scored, a goalie makes a save, or the puck goes past the blue line on their end. Players can intentionally pass the puck out of their end to create a "breakout" situation where the coach will pass their team a new puck (you can see this example in the video if you watch closely).
- If the puck goes past the blue line it is out of play.
- Each team battles to score.
- The shift length should be anywhere from 15 - 45 seconds long.
Coaching Points
- Head up: Everyone with and without the puck needs to keep their head up and on a swivel. It is important to know where the puck is, where your teammates are and where the opposition is.
- Stick on the ice: This is important for the forwards (because it shows your teammate where you want the puck) and for the defense (it allows you to angle and cut off passing lanes).
- Communicate: There will be lots of new pucks and transitions so it is important to communicate with your teammates and coaches (or players) who are passing the new pucks.
- Move to space: Forwards should jump to open space and become an outlet for their teammate if they do not have the puck.
Variations:
- You can play this game in a 2v2 or 3v3 setup.
- You can allow players to pass the puck to their coach. This variation was not shown in the video.
Length of Time:
10-min
Station Number:
6