Rows

Full Width
Grid

Cheat Sheet
U14 - Offensive Zone Skills & Game Play
U14 - Offensive Zone Skills & Game Play
Tuesday, October 12th, 2021
The focus of this practice is gaining and maintaining possession of the puck in the offensive zone, while also highlighting skills to generate scoring opportunities. The practice balances skill work and game play to encourage players to improve their recognition of plays at the offensive blue line, below the goal line, and the quiet areas for quick shots.
Key Coaching Points:
- First Touch - The first touch of the puck is crucial in dicating if, and how, your team's possession will continue in the offensive zone. Working on players' skill set for first touch on wall play is highly worth the time and repetitions.
- Creating 2v1s - With cycle players or small area games, encourage players to recognize how they can create 2v1 situations with good puck support and player movement in order to isolate a defender and create a scoring opportunity.
- Mobility on Blue Line - Encourage defensemen to get more comfortable moving along the blue line, receiving pucks in different ways, and getting shots on net or shooting for tips/redirects.
Practice Layout

Puck Retrieval Along The Boards
Details::
Retrieving the puck along the boards happens countless times throughout the course of the game and it is where many 1 on 1 battles are won or lost. When players collect the puck off of the boards is not usually a highlight-reel play, but if they are able to learn a few simple concepts, they will be able to impact the flow of the game. These concepts will allow players to create space so they have time to make a play. Plus, with an evasive move, they will be much harder to hit!
In the video above, Coach Ben Eaves discusses two major concepts when retrieving a puck:
- Look Over Your Shoulder: This is concept # 1 because it is most important. Looking over your shoulder will allow you to know if you have time, or need to make an evasive move to create time.
- Retrieve The Puck At An Angle: This will allow you to keep your speed up while you are going to get the puck. Plus it is much safer than going head-on into the boards.
The video gives you three options to practice:
- Option 1: If you look over your shoulder and see you have time, continue skating full speed at an angle to pick up the puck and bring it up ice.
- Option 2: If you look over your shoulder and you see you have pressure, skate at an angle but use your upper body to deceive the defending team and quickly turn up ice.
- Option 3: If you look over your shoulder and you see someone right on you, point your feet (which will point your body) one way and quickly move your hips and move your feet in the opposite direction to evade the defender. This is usually the most effective but will take time and good edgework to get comfortable with. Note: When you get comfortable with Option 3, combine the lower body fakes with upper body fakes to really throw off a defender!
Bonus: Watch the Toronto Maple Leafs practice their puck retrievals and forchecking in this fun 1 on 1 battle.
Length of Time:
2-3min
Coach's Notes:
Discuss this skill and corresponding habits with your players before getting on the ice, when possible.
Picking Up Rimmed Pucks Warm Up
Details::
This drill is a great skill warm up that allows players different affordances in picking up rimmed pucks. The drill starts with players set up at both ends of the ice. On one half of the ice, pucks are being rimmed from below the goal line for a pick up around the half wall. Have players change the way they pick up the puck and attack space or protect the puck (spin off, forehand, backhand, etc) each time to try different skills, and get multiple reps from both sides of the zone. Once the puck is picked up, the player has the option to pass to either line for a quick touch back before shooting.
The other half of the ice is used to work on picking up rimmed pucks below the goal line. The variations are similar but this puts the skill in a different area of the ice. A player rims the puck from the half wall down below the goal line. A player from the opposite side comes down to pick up the puck. They can work on skating into it, using their forehand, backhand, feet, or spinning off. Whichever way they decide, they must quickly move the puck to the line on that side and receive a quick touch pass back before shooting.
After players get 2-3 reps per side on their half of the ice, have players switch ends.

Length of Time:
10-12min
Station Number:
1
Coach's Notes:
Ensure players get 2-3 reps on each side of their zone before switching ends.
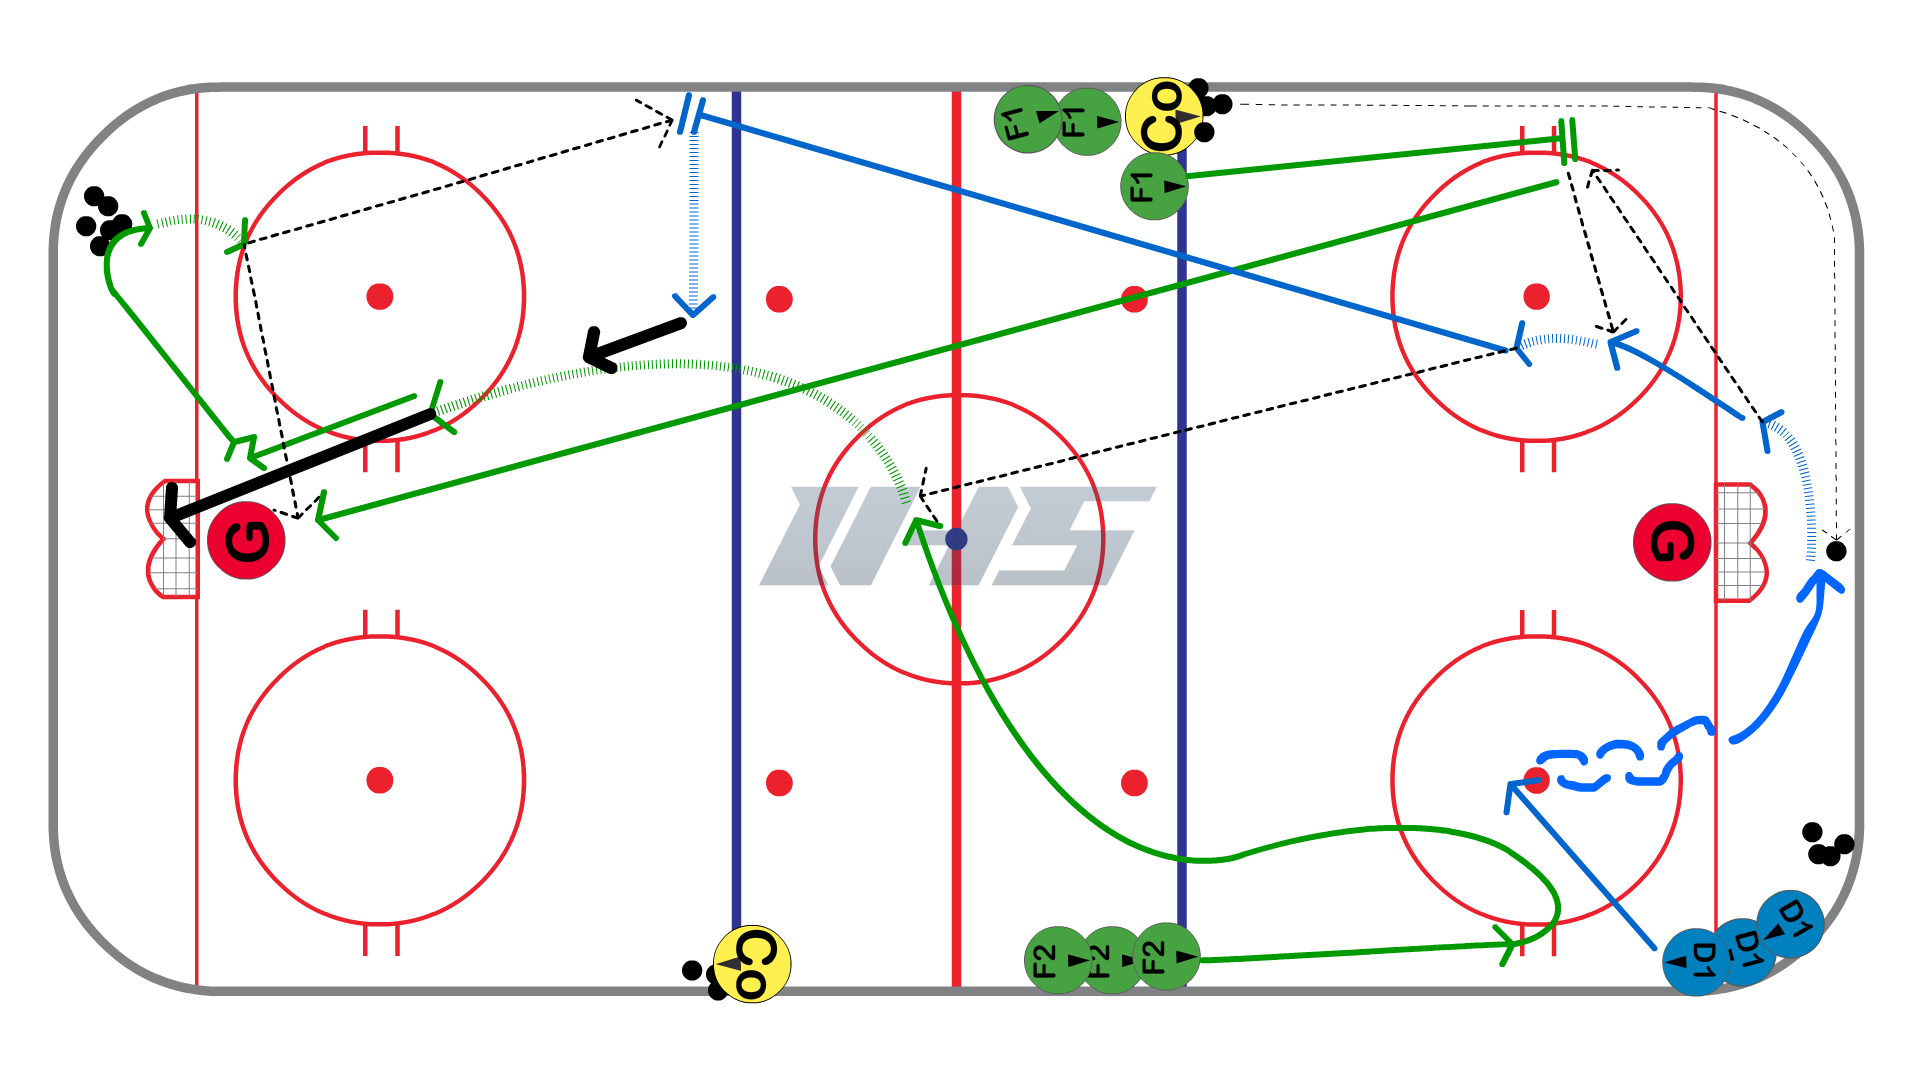
Bump Back
Details::
Set Up
This drill runs out of both ends at the same time.
- Place four equal lines of forwards at the blue lines.
- Opposite lines have pucks with coach as shown in diagram.
- Place pucks at opposite corners.
- Two lines of defense in opposite corners as shown in diagram.
Execution
- On the whistle the coach dumps a puck behind the net.
- D1 skates forward to the dot, transitions backwards, pivots, and retrieves the puck behind the net.
- F1 skates down the wall into breakout position receives a pass from D1 and give a pass right back to D1.
- D1 receives the puck back from F1 and makes a stretch pass to F2 in the neutral zone.
- F2 takes a shot on net, stops for any rebound, and then skates to the corner to retrieve puck #2.
- F2 carries puck up wall and makes a back door pass to F1 as they drive the net.
- F1 stop in front after receiving pass from F2 and then goes to retreive puck #3 from the corner.
- F1 makes a pass to D1 at the blue line and then goes to the net for a screen or tip.
Coaching Points
- Defense work on good footwork on transitions and pivots.
- Stay inside the dots for "Bump Back" from F1.
- F2 needs to control speed and have good timing for stretch pass from D1.
- F1 needs to have good net drive (stick on ice, strong bottom hand)
- F1 needs to take away goalies eyes on D1's shot
Drill Image:
Length of Time:
8-10min
Station Number:
2
Coach's Notes:
Progress to adding in a defender to create 2v1 situations off the rush and in front of the net.
Offensive Zone Cycling with High Roll
Details::
This is an offensive zone hockey drill that gets the defense involved in the play. It can be useful as a power play drill as well. Set up four lines along the blue line, the defense should be against the boards, and the two forward lines should be in line with the face off dots. The coach is set up in the middle with the pucks. The coach starts the drill by dumping the puck into one of the corners. The strong side forward (F1) will sprint into the corner to get the puck and make a tight control turn up the boards. The weak side forward follows F1 into the corner and calls for a cycle. F1 cycles the puck down to F2 and then continues into the slot. When F2 gets the puck, the strong side defense (D1) initiates the play by skating towards F2. F2 needs to use their body to create separation from the boards so they can leave the puck for D1. When D1 gets the puck they have three options. First they can throw the puck on net and hope for a re-direct or rebound. Secondly they can send F1 a hard pass across the crease for a one-timer. Third, they can pass back to F2 in the high slot. Int he next repetition the coach can dump a puck into the opposite corner so players can work from both sides.
Drill Image:

Length of Time:
10-12min
Station Number:
3
Deceptive Point Shooting Progression
Details::
Getting shots through from the point is extremely important. It can be the difference between a wasted scoring opportunity or breakaway for the other team!
Here are 3 Different Shots for a defenceman to practice with a simple set up. The goal of this progression is to get comfortable with quickly getting the puck to an open shooting lane and not just keeping your head down and shooting right into an attacking player.
Shooting Progression # 1
- Setup: Show the coach your forehand. The coach will slide the puck to your backhand. Collect the puck with your backhand, keep your head up, move the puck to your forehand, explode to create space and get a quick shot off.
- Shot 1: Quick forehand shot.
- Shot 2: Forehand shot but aim to create more space and distance from the coach.
Shooting Progression # 2
- Setup: Coach will pass to your forehand. Collect the puck and keep your head up.
- Shot 1: Quick shot that is pulled around the coach.
- Shot 2: Fake your forehand pull and escape to your forehand side to deliver the shot on net.
Shooting Progression # 3
- Setup: Show the coach your forehand. The coach will slide the puck to your backhand. Collect the puck with your backhand, keep your head up, move the puck to your forehand.
- Shot 1: Quick forehand shot (same as Progression # 1, Shot 1).
- Shot 2: Fake the forehand shot, escape and set up a slapshot.
Progression Variations
- Add additional obstacles that the players need to shoot around.
- If you do not have a player or coach to pass the puck, the defense can retrieve a puck from a pile of pucks and backpedal to the point and then begin the progression.
- You can add a forward breaking to the net that the D must try to pass to for a deflection.
- Add a forward in front of the net that can work on tips.
- Players can also work on learning how to Change Their Shot Angle to add additional deception in their shot.
Length of Time:
8-10min
Station Number:
4
Coach's Notes:
Have both defenders and forwards work on this skill of moving laterally along the blue line. Player in front of the net is working on screening the goalie and redirects.
2 vs 2 Rebound Battle Drill
Details::
Winning loose puck battles is a major deciding factor in the outcome of a game. This battle drill challenges players to compete for a loose puck after a rebound and have the awareness to pass the puck to their teammate at the point. After the loose puck battle is won, the player passes it back to their teammate at the point, which will begin a 2 vs 1.
Setup:
- This can be setup to be a station, or a half ice drill.
- A coach or player dumps the puck on net and the goalie plays it to either corner.
- 2 players are spread out and charge into the corner to compete for the puck. Whoever comes out with the puck must pass it to their point player to begin a 2 vs 1.
- The drill is stopped after a goal, the goalie freezes it, or the puck is moved out of the zone.
Offensive Coaching Points:
- Players who arrive at the puck first should work on deceptive fakes with their body to escape from the corner. Fakes with your hips and pointing your skates in the opposite direction are extremely effective in this situation.
- Once you have the puck, protect it, get your head up and make a pass to the point.
- The point should be active calling for the puck and moving to space.
Defending Coaching Points:
- The defender should work on playing the body in the corner with stick on puck.
- When 2 vs. 1 begins, the defender should hold the middle and try to force a bad angle shot.
- Have good stick position. Do not swing your stick as it will open up passing lanes and make you off balance.
Variations:
- You can allow the point player that does not receive the pass to jump into the play so it is a full 2 vs 2.
- You can have only one point player, which is demonstrated in the 2 vs 1 Rebound Battle.

Length of Time:
10-min
Station Number:
5
Coach's Notes:
Progress to 2v2 and add player to get up to 3v3. Award points for cyle plays, shots on net, and goals for.