
Rows

Full Width
Grid

Cheat Sheet
U12 Puck Protection Practice
U12 Puck Protection Practice
Friday, September 2nd, 2022
This practice focuses on developing the technical and tactical puck protection skills and spatial awareness.
Key Coaching Points
Puck protection is a skill that should be utilized to create more time and space to make a play
The 3 key fundamentals of puck protection:
- Be aware and recognize where pressure is coming from
- Use your body position to shield the puck from pressure
- Keep your head up to see your teammates and the opposition to make a play after protecting the puck
Setup Notes
- Run the Corner Puck Protection & Point to Half Wall 2v1 simultaneously - one in each end
- Run the Double Gates Activation Game out of both ends
Supporting Video
Ryan O'Reilly Puck Protection Example
Practice Layout

Protect The Puck Warm-Up (Individual & Team)
Details::
This is a fun dynamic warm-up that helps coaches jump-start practice with a competitive puck protection exercise, followed by a competitive team puck possession exercise. Depending on the age and skill level of your players, coaches can modify this drill to make it easier by adding more pucks, or reducing the number of players involved. Scroll to the bottom of this description and you can view examples of how to make these exercises a game (which makes it very fun for younger players).
Setup
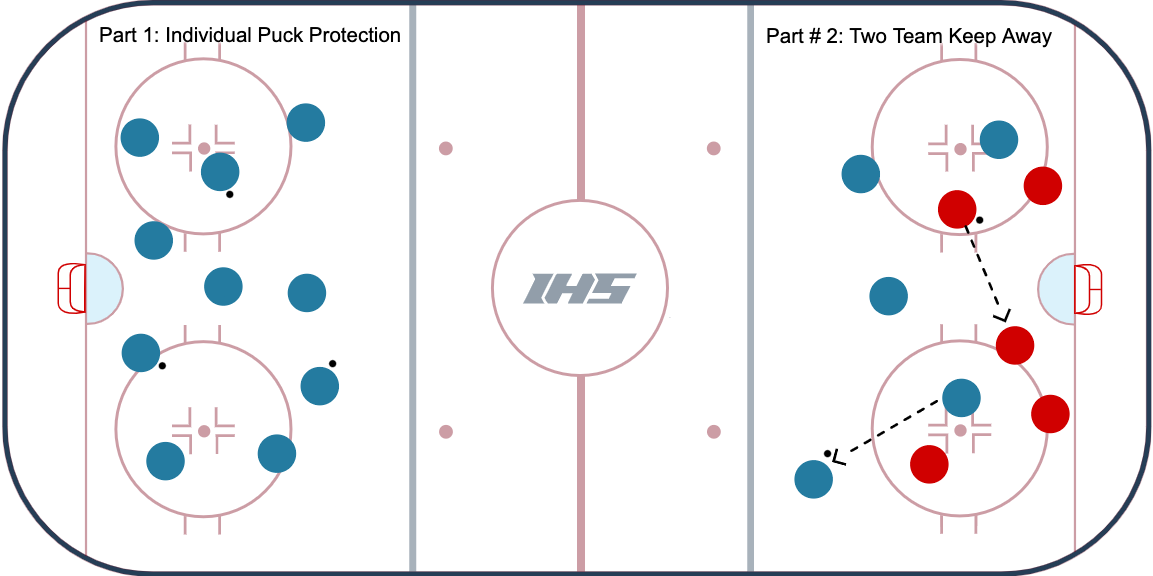
Part # 1: Individual Puck Protection
- Split up your team into two groups. If you have full ice, each group can play in their own offensive zone. If you have half ice, one larger group can play in the zone, and the second group can play in the neutral zone.
- On the whistle, a coach chips in a limited number of pucks for players to battle over. In the video, there were 3 pucks used for 10 players. Coaches can add more pucks to make it easier for the players or for younger age groups. Play this out for a minute or so before you switch to a second group or move to Part # 2 of the drill.
Part # 2: Team Keep Away
- The coach combines the groups so there are now two teams playing inside one zone.
- On the whistle, the coach chips in a limited number of pucks for players to battle over. In the video, there were 2 pucks used for the two teams.
Variations
- Make it easier: add more pucks or reduce the number of players.
- Ice space: Can set this up in different areas of the ice.
- Players: Can use your whole team at once or split up into groups so players get a rest.
- Gamify: Can make drill into a very fun competitive game by playing Finders Keepers (players are knocked out of each round if they do not have a puck when time is called) and Finders Keepers With Teams (the team with the most pucks at the end when time is called wins).
Coaching Points
- Part #1:
- If you have the puck, work to protect it with your body and by keeping your head up so you can skate to space, or cut back to create space.
- If you do not have the puck, keep your stick on the ice and compete to get the puck back.
- Part # 2:
- If your team has the puck, keep your head up so you can utilize give & gos!
- If your team does not have the puck, keep your stick on the ice to take away passing lanes and compete to get the puck back.
Length of Time:
10- 12 mins
Station Number:
Run out of both ends
Corner Puck Protection
Details::
A simple, yet highly effective drill that helps players understand the concepts of puck protection along the boards.
Setup:
- Puck and players on the corner faceoff dot.
- Optional: coaches can add barriers to keep the players low and to navigate around.
- Goalies are optional.
Drill Details:
- Coach or player chips the puck into the corner.
- Player 1 jumps into the corner and scans the ice (looking over their shoulder).
- The player collects the puck and skates towards the net along the boards.
- Then the player performs a tight turn heading away from the net and keeps the puck along the boards (to protect it).
- The player skates back up ice away from the net and performs one more tight turn along the boards and drives to the net to get a shot on the goal.
Drill Progressions:
- Add Pressure: Add a "shadow" coach or defenceman (like it is shown in the video) to reinforce the skill.
- Game: After the players get comfortable with this setup you can create a 1v1 game in the same area where forward tries to protect the puck and drive the net to score a goal, while the defense tries to defend, take the puck and skate it out of the "game area."
Coaching Points:
- Scan the Ice: Encourage players to look over their shoulders to scan the ice and collect information so they can make a decision before they get the puck. Looking over your shoulder is a great habit to form!
- Puck Along Boards: Players should practice keeping the puck along the boards so that they can use their body to protect the puck from a defender.
- Strong Hockey Stance & Tight Turns: Make sure players have their knees bent and shoulder with apart so they are strong on their skates. Watch the coaching videos below to learn more about proper corner turn & jam turn techniques.
Drill Image:
Length of Time:
10-12 mins
Station Number:
1
Coach's Notes:
Run this out of both corners in one end. Stagger the start out of each corner
Point to Half Wall 2 vs 1
Details::
The Point to Half Wall is an excellent small area game that helps players practice a 2 vs 1 in a small space along the boards. The game also reinforces important skills like keeping your head up, moving to open spaces, protecting the puck and communication.
The goal of the game is for the offense is to connect on 4 consecutive passes in a row. If they do so, they win and are allowed to shoot on net. If the defense takes the puck away, or the puck goes out of bounds 2 times during the game the defense wins and is awarded a shot on net.
Setup
- Playing Area: Use 4 cones or tires that create a triangle from the half wall to the middle of the blue line.
- Goalie Setup: This can be set up as a station with a goalie, or without. If you use a goalie it can be placed in the crease or the net can be moved so the drill is a station.
- Players: Alternate players. It is beneficial for players to get reps on both offense and defense sides.
- Passes: You can require 4 (or a different amount) of consecutive passes to win.
- Defense: If the defense is taking the puck away too much, you can tell the defense to flip their stick over.
- Winner: The winning side gets a shot on net. Other winning options are:
- If the offense wins:
- The last person with the puck gets a shot on net.
- Both players are given a puck and can shoot on different goalies.
- The game moves to a 2 vs 1 in front of the net and offense is allowed one shot if they can get it off.
- If the defense wins:
- They get a shot on net.
- The game moves to a 1 on 1 in front of the net and the defense is allowed one shot if they can get it off. The losing offense team needs to communicate with each other as to who is going to go after the defense.
- If the offense wins:
Coaching Points
- Use the boards! They are your friend!
- If used properly, the boards can be used as an extra player out there and are helpful for bank passes and puck protection.
- Offensive players need to protect the puck until they can make a play and then expose the puck to make a pass.
- Offensive players have to move without the puck. Think "Give & Go!"
- Defensive players are most successful with active sticks and stop and starts. There are no short cuts!
Progressions
- Have one of the offensive players be a "Point Player" who has to stay up around the blueline.
- This progression can be great for defenceman working on their puckhandling at the point & forwards becoming outlet passes.
- Create a smaller "playing area" to make it tougher on the offense.
- Play the Corner to Half Wall 2 vs 1.
Length of Time:
10-12 mins
Station Number:
2
Coach's Notes:
Run this out of both sides of the zone.
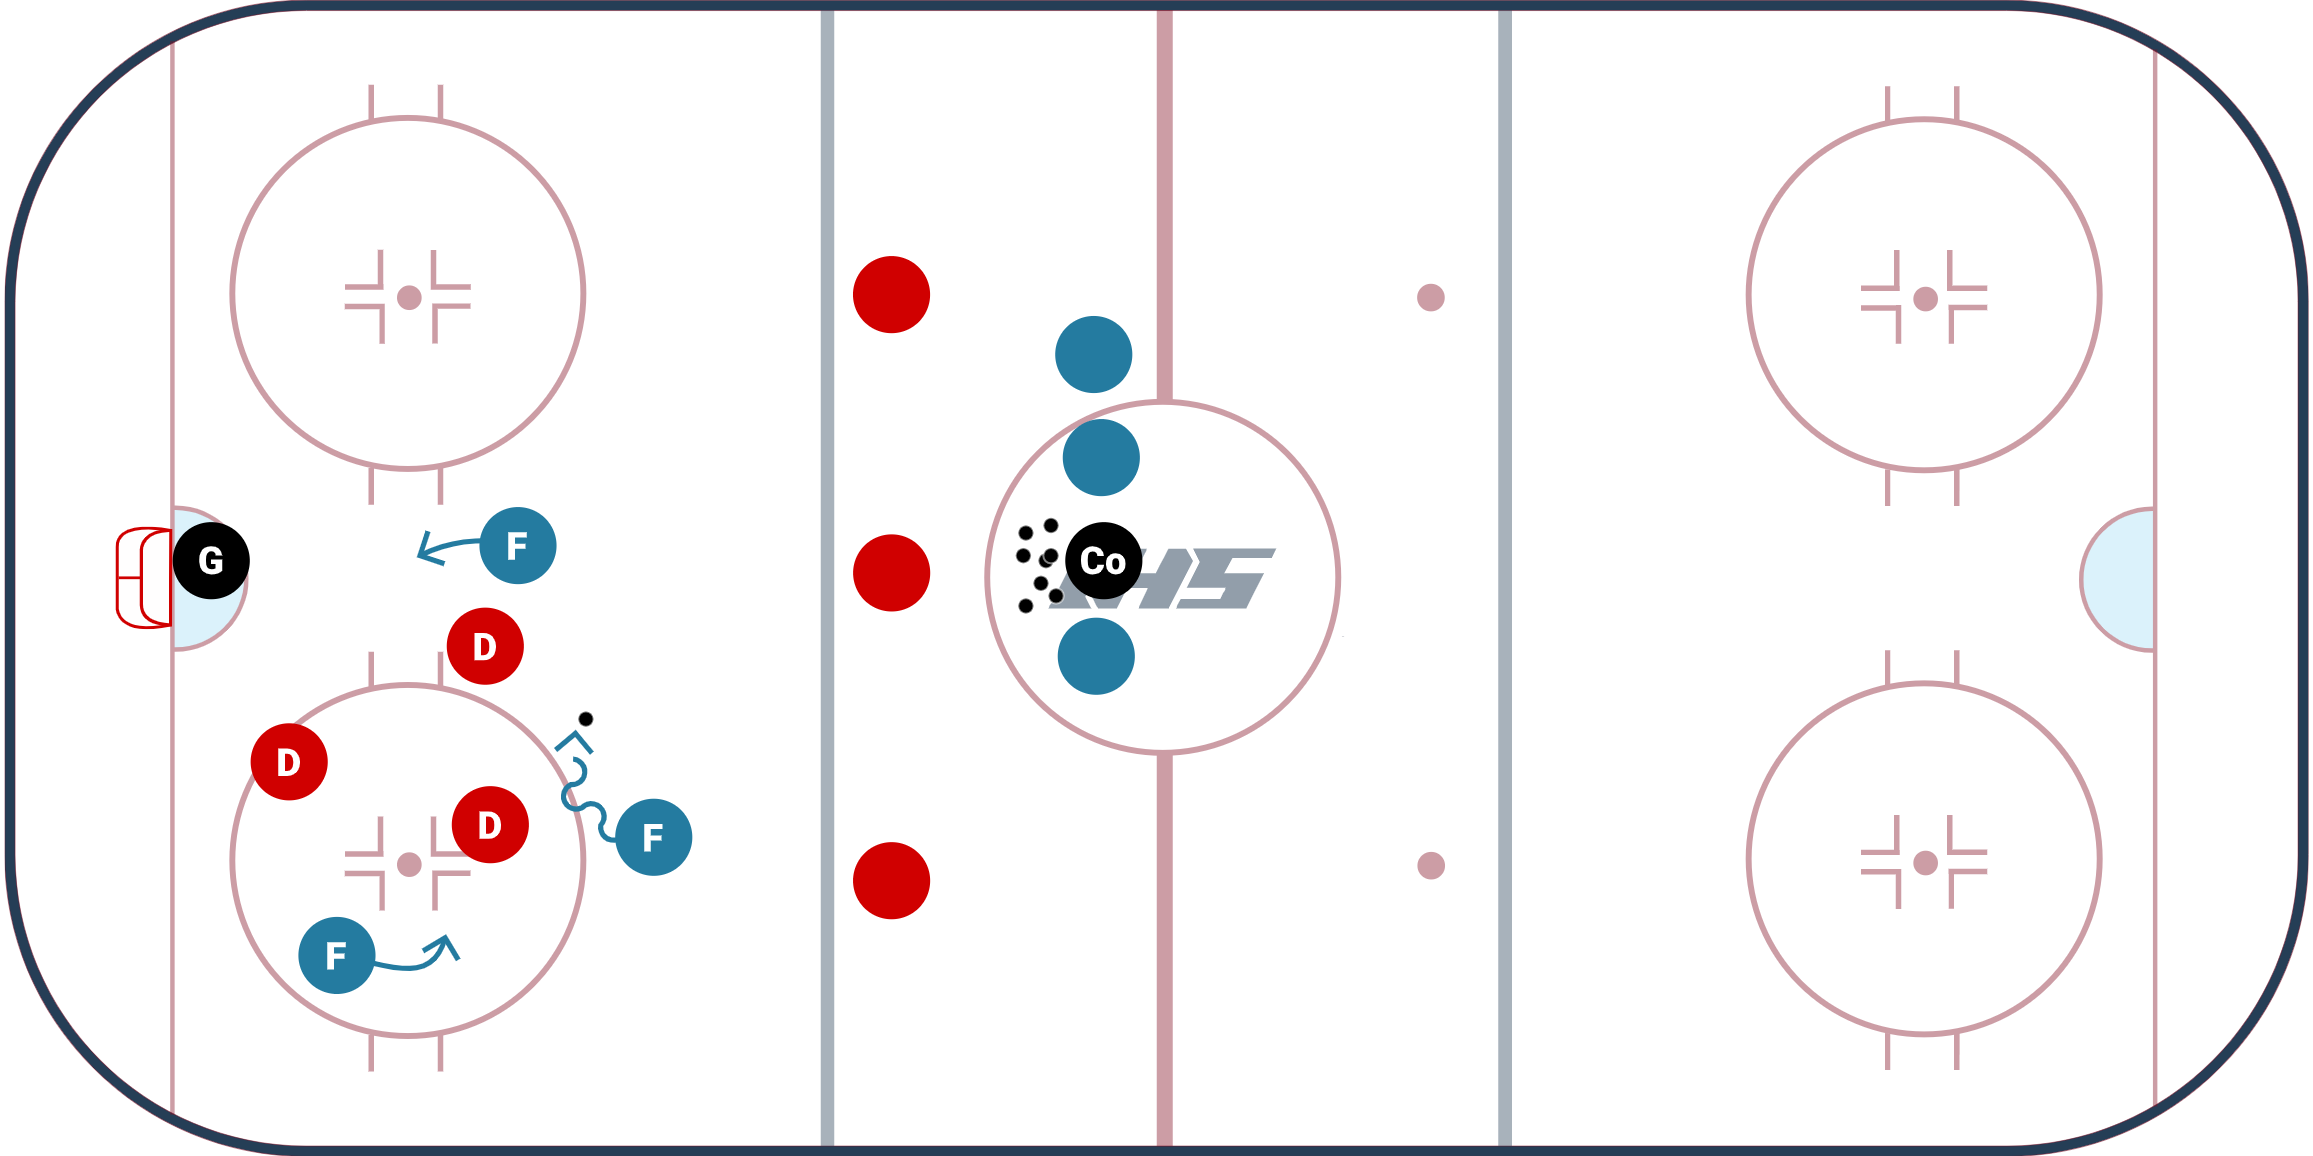
Double Gates Activation Game
Details::
The Double Gates Activation Game from Coach Alyssa Gagliardi is a competitive small area game that starts out as a 1 on 1 and becomes a 2 on 1 after a player skates through one of the gates. This can also be modified to be a 2 on 2 that becomes a 3 on 2.
Setup
- Place a gate (gates can be made by tires, cones, etc) on each side of the net. This will create two gates and two options for the offensive player to skate though.
- Place one forward and one defender in one of the corners or circles.
- Place an additional player at the high slot or point.
- To start: a coach chips a puck in the corner to begin a 1 on 1 battle.
- The forward is trying to first skate through a gate. Once the forward skates through the gate, they are able to pass it to the open player at the point to begin a 2 on 1. The offensive team is trying to score a goal.
- The defender is trying to strip the puck during the 1 on 1 and/or the 2 on 1 and skate out of the zone.
- The coach can stop the play when there is a goal, the defender skates the puck out of the zone, the goalie freezes the puck or enough time has passed (15 - 30 seconds).
Coaching Points
- Offensive player:
- Look over your shoulder to see where the pressure is coming from.
- Do not expose the puck until you are ready to make a play. Use the net and the boards to protect the puck!
- Keep head up to be aware of where the gates are and the extra player is.
- Defending player:
- Work on taking a good angle.
- Keep your stick on the ice to go after the puck and to block passing lanes.
Game Variations
- Can allow the forward to immediately try to score a goal, or you can require them to first go through the gate before they can score. Either way, if they go through the gate the other forward is activated.
- Can set up gates in different areas of the ice.
- Can add gates at the blueline that the defense needs to skate through instead of skating over the blueline.
- Can start the game in different areas of the zone.
- Can setup the game in smaller areas of the ice (example - 1/4 ice instead of 1/2 ice.)
- Can be modified to be a 2 on 2 that becomes a 3 on 2 (diagram displayed below)

Length of Time:
10-12 mins
Station Number:
Run this out of both ends
Coach's Notes:
Option to run this as a 2 v 2 with a 3rd offensive player activating
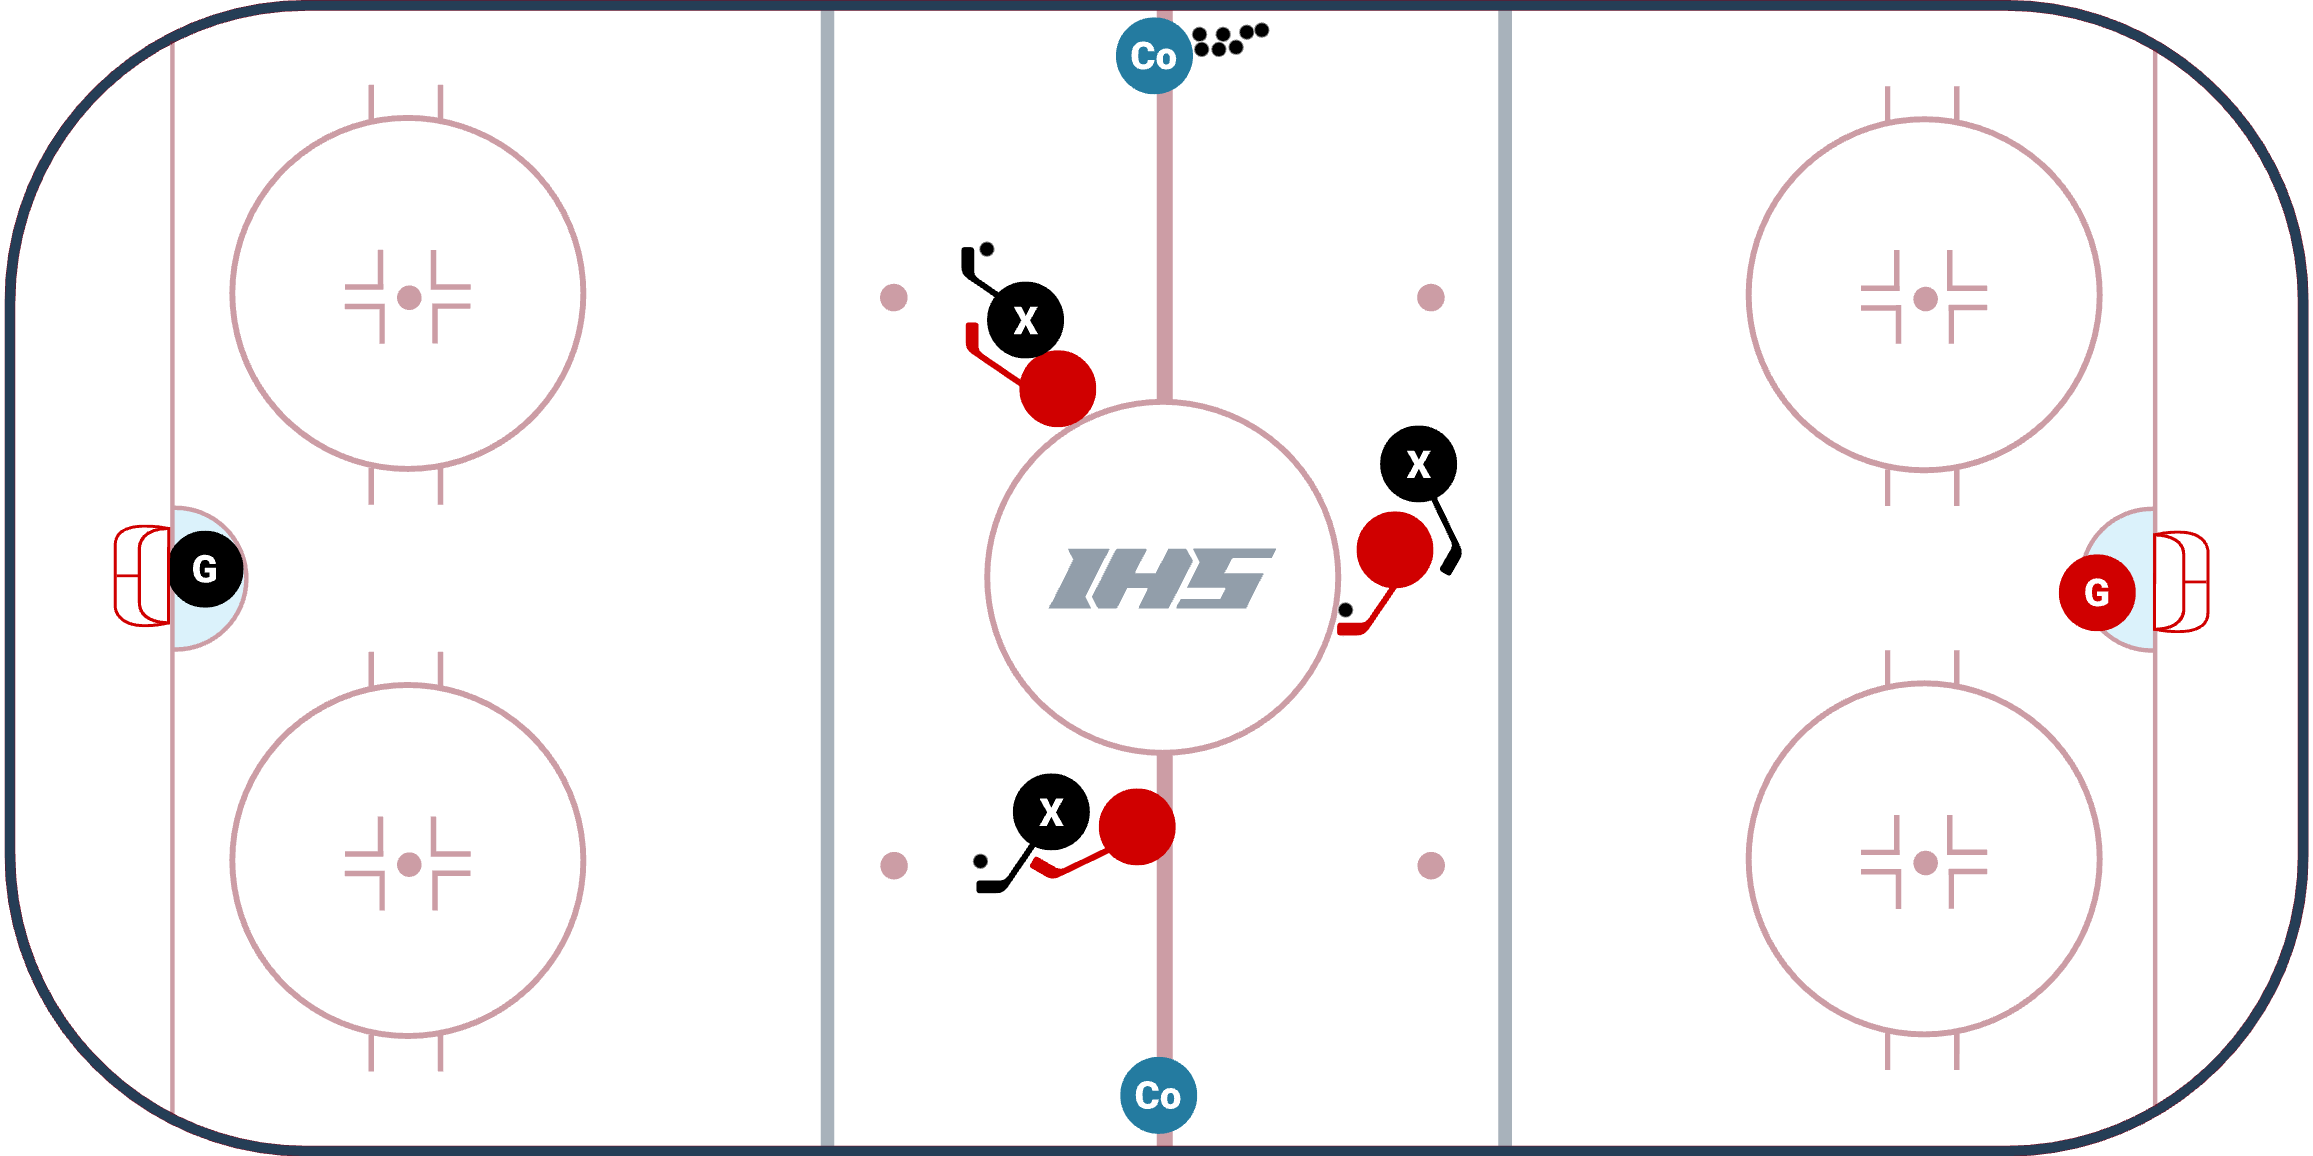
3 x 1 v 1's to 3 v 3
Details::
This drill from Coach Alyssa Gagliardi starts out with three 1 vs. 1's taking place at the same time and on the whistle, a 3 vs. 3 game begins. The drill can be full ice (as shown in the video), or modified to be half-ice.
Setup
- The drill starts out with three 1v1s happening at the same time in the neutral zone. Players are encouraged to practice different puck protection skills, with the main focus on being "cutting the hands" of the defender. Cut the hands is a puck protection move where you skate into a defender's extended stick position to protect the puck and limit their ability to take the puck, while also allowing you to see options on the ice.
- Players play out their respective 1v1s for 10-20 seconds. On the whistle, the coach throws a new puck in a different area of the ice, and players must assess the situation and play 3v3 full-ice. Play it out for 15-30 seconds.
Modifications
- Starting Setup: This drill can be set up in any zone or limited space to establish different spatial awareness, transition patterns, and communication.
- Half-Ice: For half-ice practices, start the drill with 3 x 1v1's in a small area in one zone. Have one outlet player for each team located just outside of the blue line. On the whistle, the coach throws in a new puck and the 3 vs. 3 begins. Teams must first pass to their outlet player before they can play offense and try to score. When you are on offense you can use your outlet at anytime. View the half-ice diagram below.
Length of Time:
10-12 mins
Station Number:
Full Ice
Coach's Notes:
Variation 1: You can also run this as a 4 v 4 or 5 v 5 depending on size of the team
Variation 2: can run this 3 v 3 half ice with nets set up cross ice or by using a gate for the defensive side to skate through when retrieving the puck
Continuous In Zone 3 vs. 3 Game
Details::
A continuous 3 vs. 3 hockey game that puts the defenders at a big disadvantage since they will be double shifting. Players will be tired so it is important for them to focus on battling, good positioning and habits during this game.
Setup:
- 3 defenders start at the blue line and 3 forwards start in the center ice circle.
- The game starts with the coach passing the puck to one of the 3 forwards (this begins the 3 vs. 3).
- Forwards try to keep possession of the puck and score.
- The defenders can end the game by skating the puck out of the zone or passing the puck to the forwards that are next in line.
- If a goal is scored, or the goalie freezes the puck, or the puck goes out of play, the coach has the option to chip another puck in the zone, or pass to the next forwards in line.
- When the shift ends (either with a goal, the defense getting the puck out of the zone, or a coach's whistle), the forwards switch to defense and the new forwards start the 3 vs. 3.
- Keep Score: 3 points for a goal, 2 points for the defense skating the puck out of the zone, 1 point for the defense passing the puck out of the zone, and 0 points if the coach blows the whistle and changes lines.
Coaching Points:
- The defense will be tired since they will be "double shifting." Encourage good positioning and habits. Stick on the ice!
- Both teams should not be afraid to hold on to the puck, and protect it until they are able to make a play.
- Both teams should work on verbal & non-verbal communication with their teammates.
- Compete to score points for your team! Celebrate points!
Variations:
- Can be set up on 1/4 ice (view animation here).
- Can be 1v1 (view example), 2v2 (view example), 3v3, or 4v4.
- Can add "gates" (like Picket Fences Game) at the point that the defenders must skate through.
Length of Time:
10-12 mins
Exposing vs. Protecting the Puck
Details::
In this video Ben Eaves demonstrates the importance of protecting the puck vs. exposing it. Use your body, hips, and stick to surround and protect the puck until you are ready to make a play. Expose the puck once your are ready to make a play.